Building a Natural Indigo Dye Kit at Home

Have you ever wanted to dye your own textiles with a deep, soulful blue but felt intimidated by the chemistry involved? This guide provides a step-by-step blueprint for assembling a functional, home-based natural indigo dye kit using the traditional vat method. We'll look at the specific tools, the chemical requirements, and the setup needed to transform plain organic cotton or linen into something spectacular.
What Supplies Do I Need for an Indigo Vat?
To build a successful indigo kit, you need a fermentation vat or a reduction vat setup consisting of an indigo pigment, an alkaline source, and a reducing agent. Most home dyers start with a "one-pot" method because it's easier to manage than complex organic fermentation. You aren't just mixing colors; you're managing a living chemical reaction.
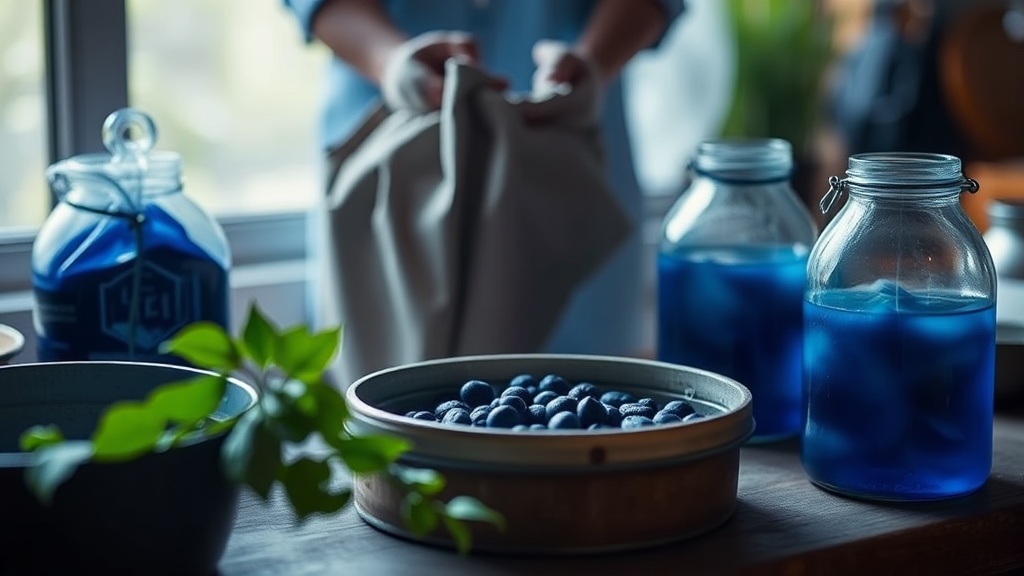
First, you'll need a vessel. A large, heavy-duty plastic bucket or a ceramic crock works best. Avoid aluminum—it reacts poorly with the high pH levels required for indigo. You'll also need a whisk or a stirring rod to introduce oxygen when necessary.
Here is a checklist of the core components:
- Indigo Powder: Look for high-quality pigment like that from Indigofera tinctoria.
- Reducing Agent: Fructose (fruit sugar) or Henna are common choices for a quick reduction.
- Alkali Source: Soda ash or Calcium Hydroxide (slaked lime).
- Measuring Tools: A digital scale that measures to 0.1g and a pH meter or high-range pH strips.
- Textiles: Natural fibers like cotton, silk, or wool (synthetic blends won't take the color well).
Don't skimp on the pH meter. It’s the single most important tool in your kit. If your vat is too acidic, the indigo won't stay in solution; if it's too alkaline, you'll damage your fabric. It's a delicate balance—honestly, it's more like a science experiment than a craft.
How Much Does a Natural Indigo Kit Cost?
A basic home indigo kit typically costs between $60 and $120 depending on whether you buy bulk chemicals or pre-made kits. If you're starting from scratch, you'll spend more upfront on the equipment, but the cost per dye session drops significantly over time.
I've broken down the estimated costs below so you can budget accordingly. Note that these prices are averages based on current market rates for hobbyist supplies.
| Item | Estimated Cost (USD) | Purpose |
|---|---|---|
| Indigo Powder (100g) | $25 - $35 | The actual pigment |
| Soda Ash / Lime | $10 - $15 | Raising the pH |
| Digital Scale | $15 - $25 | Precision measuring |
| pH Test Strips/Meter | $10 - $30 | Monitoring acidity |
| Glass/Plastic Vat | $5 - $20 | Holding the dye |
If you're on a tight budget, you can often find glass jars at thrift stores to use as your small-scale vat. Just make sure they are sturdy. You don't want a thermal shock cracking your container mid-process.
How Do You Prepare the Indigo Vat?
Preparing the vat involves dissolving the indigo in an alkaline solution and then "reducing" the oxygen out of the liquid to make the dye soluble. This is the part that makes people nervous, but once you get the rhythm, it becomes second than second nature.
First, heat your water. It doesn't need to be boiling, but it should be quite warm (around 120°F to 140°F). Dissolve your indigo powder into a small amount of warm water to create a paste—this prevents those annoying un-dissolved clumps from floating in your vat. Once the paste is smooth, add it to your main vat of water and your alkaline source.
The goal is to reach a pH level between 10 and 11.5. This is where your pH meter becomes your best friend. After the pH is set, you'll add your reducing agent (like the fructose mentioned earlier). After stirring, you'll see the liquid turn a yellowish-green color and a metallic "indigo" film form on the surface. This film is often called the "flower"—it's a sign your vat is healthy and ready to work.
A few tips for a smooth process:
- Avoid Bubbles: When stirring, try not to introduce too much air. You want to reduce oxygen, not add it.
- The Color Check: If the vat looks murky or brown rather than green/yellow, your reduction has failed.
- The Dip: Submerge your fabric slowly. Don't splash!
I once tried to rush a vat by using lukewarm water instead of warm, and the result was a total disaster—the dye just sat on the surface of the fibers rather than penetrating them. Patience is a requirement here.
When you're finished with your dye sessions, you'll need to clean your tools. If you use any brushes for detail work or resist application, make sure to clean your brushes with natural soap to prevent any residue from hardening. It's much easier to clean them immediately than to scrub dried pigment later.
Once your fabric is dyed, the magic actually happens during the oxidation phase. When you pull the fabric out of the vat, it will look green. As it hits the oxygen in the air, it will turn blue right before your eyes. This is the most satisfying part of the whole process—watching the color deepen as the oxygen reacts with the fibers.
If the color isn't deep enough, don't be afraid to dip it multiple times. It's better to do ten short dips than one long soak. Each dip builds the depth of color. You can also vary the temperature and pH to experiment with different shades, though a consistent vat is usually better for predictable results.
Keep your vat covered when you aren't using it. This prevents the indigo from oxidizing too quickly and keeps your dye life much longer. A well-maintained vat can last for many sessions if you treat it with respect.